-
[Node.js + AJAX] 편집 페이지(Author) - 무한 스크롤 / Fetch API생활코딩/WEBn 2021. 2. 14. 21:33
생활코딩 AJAX 강의를 완료하고, 기존에 Node.js로 백엔드를 구현해놓은 코드에 AJAX를 적용해보았다.
가장 큰 차이는 기존에는 MySQL 쿼리문으로 직접 받아왔던 데이터를, fetch API에서는 URL로 받아온다는 것.
Node.js의 app 라우팅 부분에 데이터 리턴을 추가해서 프론트의 fetch API와 URL로 소통할 수 있도록 했다.
이쪽을 참조했다: node-js-mysql-how-to-do-the-ajax-call-and-access-the-data-on-server-js
작업하다보니 내용이 길어져서 글을 나누었다.
기본 페이지(Rread): [Javascript - AJAX] Node.js + AJAX - 기본 페이지
편집 페이지(Author): 현재 포스팅
편집 페이지(Create/Update/Delete): [Javascript - AJAX] Node.js + AJAX - 편집 페이지(Create/Update/Delete)
작업하면서 배운 것: [Javascript - AJAX] Node.js + AJAX - 배운 것
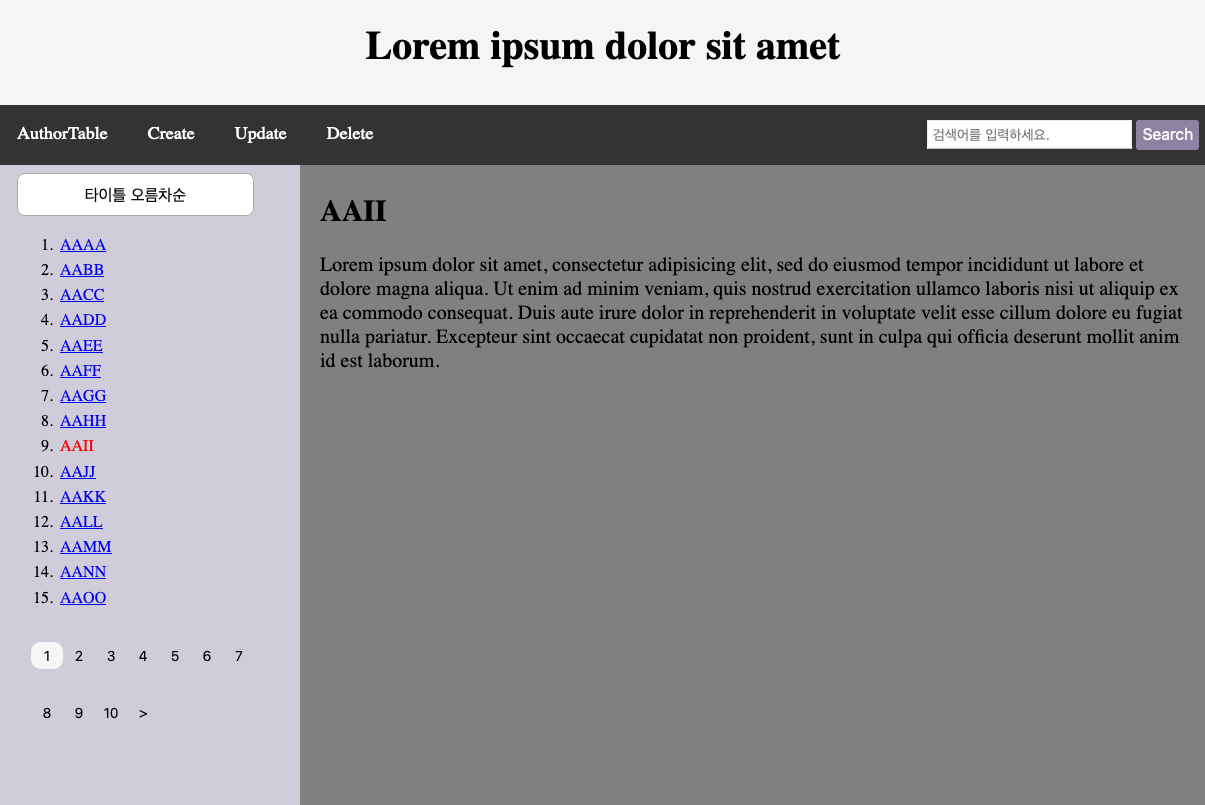
현재 상태는 이렇다. 까만 배너라인을 기준으로 아래쪽 컨텐츠 조회 기능은 완성되었고, 이제 배너에 표시되는 편집메뉴,
AuthorTable, Create, Update, Delete, Search 기능을 완성할 차례다. 먼저 Author를 만든다.
AuthorTable
기존 AuthorTable은 이런 모양이었다.

Create 버튼을 누르면 저자 생성 폼이, Update를 누르면 해당 저자 업데이트 폼이 뜨고, Delete를 누르면 저자가 삭제되는 식이다.
데이터 만들기
테이블을 만들려면 데이터가 있어야 하니, 우선 데이터를 만든다. 알파벳 개수만큼만 있으면 될 것 같다. 우선 테이블부터 만들고,
CREATE TABLE authorTest(
 id INT(11) NOT NULL AUTO_INCREMENT,
 name VARCHAR(100) NULL,
 profile VARCHAR(500) NULL,
 PRIMARY KEY(id));
데이터를 넣어줬다. words에 넣어준 텍스트는 loremipsum.io/ 에서 가져왔다.
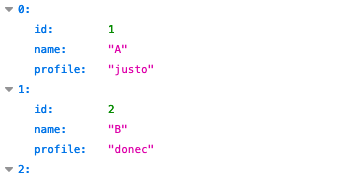
var letter = ['A', 'B', 'C', 'D', 'E', 'F', 'G', 'H', 'I', 'J', 'K', 'L', 'M', 'N', 'O', 'P', 'Q', 'R', 'S', 'T', 'U', 'V', 'W', 'X', 'Y', 'Z'];
var words = 'justo donec enim diam vulputate ut pharetra sit amet aliquam id diam maecenas ultricies mi eget mauris pharetra et ultrices neque ornare aenean euismod elementum nisi'.split(" ");

for (var i in letter) {
  var name = letter[i];
  var profile = words[i];
  db.query('INSERT INTO authorTest (name, profile) VALUES (?, ?)', [name, profile], function(err, result){
    if (err) {throw err};
  });
};
그리고 현재 비어있는 토픽목록 db의 author_id에 랜덤으로 아이디를 넣어준다.
db.query('SELECT COUNT(*) as CNT FROM test', function(err, result){
  if (err) { throw err };
  var count = result[0]['CNT'];
  for (var i=1; i<count+1; i++){
    var randomId = Math.floor(Math.random() * letter.length)+1;  // 알파벳 26글자
    db.query('UPDATE test SET author_id=? WHERE id=?', [randomId, i], function(err2, result2){
      if (err) { throw err };
  	});
  }
});
이제 토픽이 들어있는 db에 author_id가 잘 들어갔나 조회해 보면
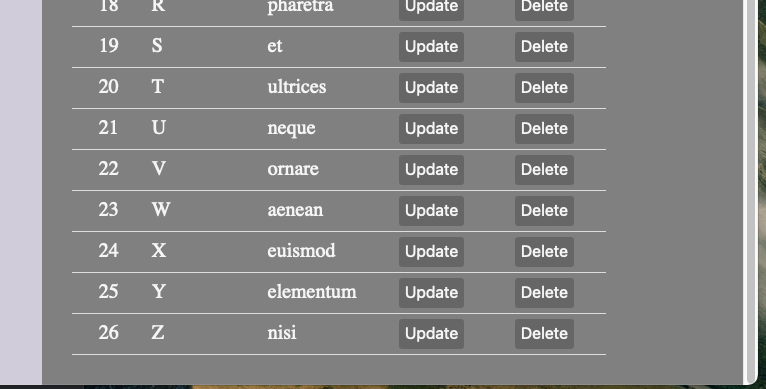
mysql> SELECT author_id, COUNT(*) FROM test GROUP BY author_id;
+-----------+----------+
| author_id | COUNT(*) |
+-----------+----------+
|         1 |       19 |
|         2 |       24 |
|         3 |       17 |
|         4 |       14 |
|         5 |       31 |
|         6 |       17 |
|         7 |       29 |
|         8 |       37 |
|         9 |       29 |
|        10 |       30 |
|        11 |       26 |
|        12 |       17 |
|        13 |       26 |
|        14 |       24 |
|        15 |       25 |
|        16 |       33 |
|        17 |       30 |
|        18 |       26 |
|        19 |       24 |
|        20 |       30 |
|        21 |       30 |
|        22 |       29 |
|        23 |       35 |
|        24 |       31 |
|        25 |       24 |
|        26 |       19 |
+-----------+----------+
26 rows in set (0.01 sec)
잘 들어갔다.
Content에 author 표시하기
원래 저자의 쓸모는 오른쪽 컨텐츠 화면 조회시에 저자가 표시되게 하는 거였으니, 해당 컨텐츠 화면에서 저자가 표시되게 수정한다.
현재 컨텐츠를 출력하는 함수는 이렇다. API에서부터 저자 정보를 받아올 수 있도록 수정해야겠다.
var viewContent = function(id){
  fetch('/content/' + String(id)).then(function(response){
    response.json().then(function(data){
      var content = `<h2>${data[0]['title']}</h2>
      <p>${data[0]['description']}</p>`;
      document.querySelector('.right').innerHTML = content;
      onEdit();
    });
  });
};
토픽과 저자 테이블이 별도기 때문에, MySQL에서 LEFT JOIN으로 데이터를 가져와야 한다.
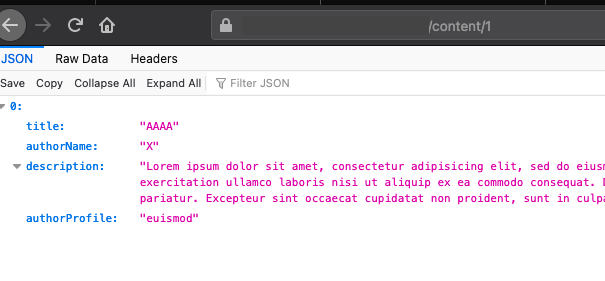
mysql> SELECT test.title, test.author_id, authorTest.name, authorTest.profile FROM test LEFT JOIN authorTest ON te
st.author_id=authorTest.id WHERE test.id=1;
+-------+-----------+------+---------+
| title | author_id | name | profile |
+-------+-----------+------+---------+
| AAAA  |        24 | X    | euismod |
+-------+-----------+------+---------+
이걸 json 형식으로 받으려면 JSON_ARRAYAGG(JSON_OBJECT())로 감싸줘야 한다.
mysql> SELECT JSON_ARRAYAGG(JSON_OBJECT('title', test.title, 'authorName', authorTest.name, 'authorProfile', autho
rTest.profile)) as 'return' FROM test LEFT JOIN authorTest ON test.author_id=authorTest.id WHERE test.id=1;
+--------------------------------------------------------------------+
| return                                                             |
+--------------------------------------------------------------------+
| [{"title": "AAAA", "authorName": "X", "authorProfile": "euismod"}] |
+--------------------------------------------------------------------+
1 row in set (0.00 sec)
기존에 있던 content API의 쿼리를 저걸로 교체하고,
if (url_parsed[1] === 'content') {
  var id = Number(url_parsed[2]);
  if (Number.isInteger(id)) {
    var query = `SELECT JSON_ARRAYAGG(JSON_OBJECT('title', test.title, 'description', test.description, 'authorName', authorTest.name, 'authorProfile', authorTest.profile)) as '?' FROM test LEFT JOIN authorTest ON test.author_id=authorTest.id WHERE test.id=?`;
    db.query(query, [id, id] , function(err, data){
      if (err) { throw err;};
      if (data.length === 0){         // 값이 나오지 않으면, 없는 id이면
        response.writeHead(404);
        response.end();
      } else {
        var result = data[0][id];
        response.setHeader('Content-Type', 'application/json');
        response.end(result);
      }
    });
  };
}
API쪽에 가서 데이터가 잘 나오나 확인해 본다.
잘 나오고 있으니, viewContent를 수정해서 저자 정보가 출력되게 한다.
var viewContent = function(id){
  fetch('/content/' + String(id)).then(function(response){
    response.json().then(function(data){
      var content = `<h2>${data[0]['title']}</h2>
      <p>${data[0]['description']}</p>
      <p class="author">Edited By
        <span class="name">${data[0]['authorName']}</span>
        <span class="profile">[${data[0]['authorProfile']}]</span>
      </p>`;
      document.querySelector('.right').innerHTML = content;
      onEdit();
    });
  });
};
CSS도 추가해주고, 잘 출력되는지 확인해본다.
.author {
  color: #C7C7C7;
  text-align: right;
}
.name {
  color: #D0D1CD;
}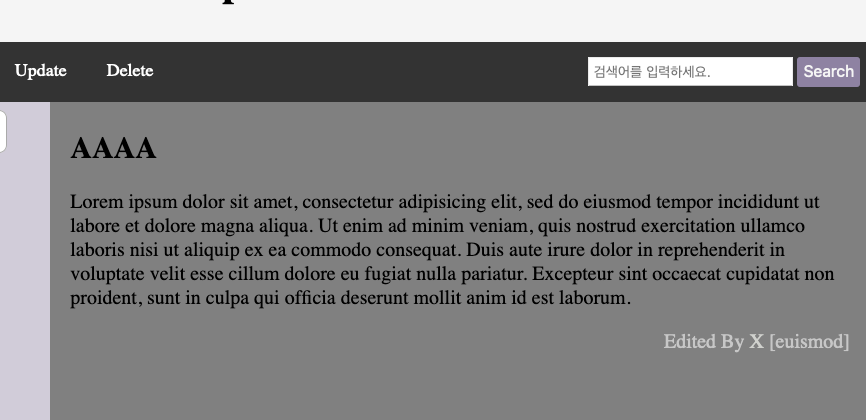
AuthorTable 레이아웃 만들기
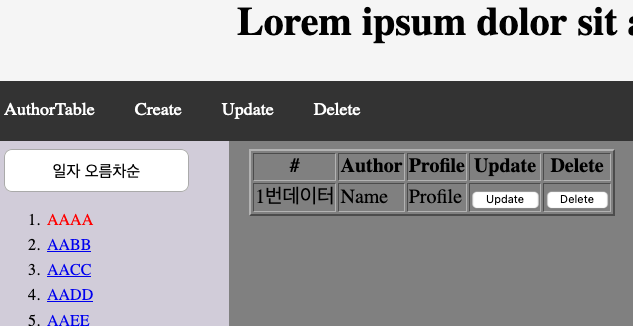
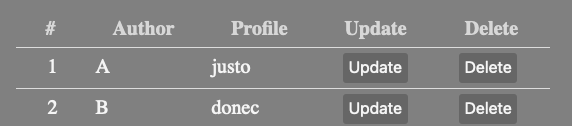
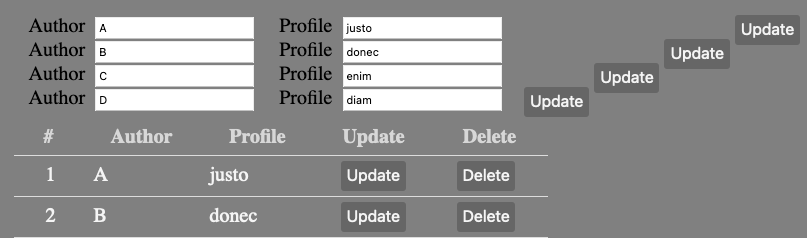
AuthorTable은 tableHead가 #, Author, Profile, Update, Delete로 구성되어 있는 테이블이다.
클릭했을 때 right에 출력해줘야 하니, querySelector('.right')를 추가해준다.
var authorPage = function(){
  var trs = `
    <tr>
      <td class="table-idx">1번데이터</td>
      <td>Name</td>
      <td>Profile</td>
      <td><button class="button-edit">Update</button></td>
      <td><button class="button-edit">Delete</button></td>
    </tr>\n`;
  var table =  `
    <table class="author-table" border=2>
      <th class="table-idx">#</th>
      <th>Author</th>
      <th>Profile</th>
      <th>Update</th>
      <th>Delete</th>
      ${trs}
    </table>`;
  document.querySelector('.right').innerHTML = table;
};

window.addEventListener("load", authorPage());
그리고 홈에서 확인해보니, 기본적인 테이블이 출력되었다.
CSS를 준다.
더보기.author-table { border: none; border-collapse: collapse; padding: 10px; margin: 10px; } .table-idx { background-color: gray; border-bottom: gray; color: #D7D7D7; padding: 1px; text-align: center; min-width: 15px; max-width: 18px; } .author-table td { border-bottom: 1px solid #ddd; color: whitesmoke; padding: 5px 6px 5px 10px; border-left: none; border-right: none; width: 100px; } .author-table th { border-bottom: 1px solid #ddd; padding: 5px; background-color: gray; color: #D7D7D7; min-width: 60px; } .button-edit { margin: 0 15px; background: #666666; border: none; border-radius: 3px; color: whitesmoke; cursor: pointer; font-size: 16px; padding: 4px 6px 6px 6px; }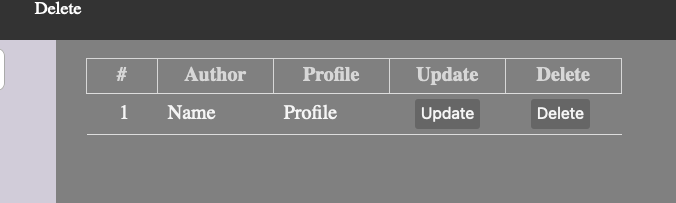
Author API - READ & 무한스크롤
이제 데이터를 출력해야 하니까, API를 만든다.
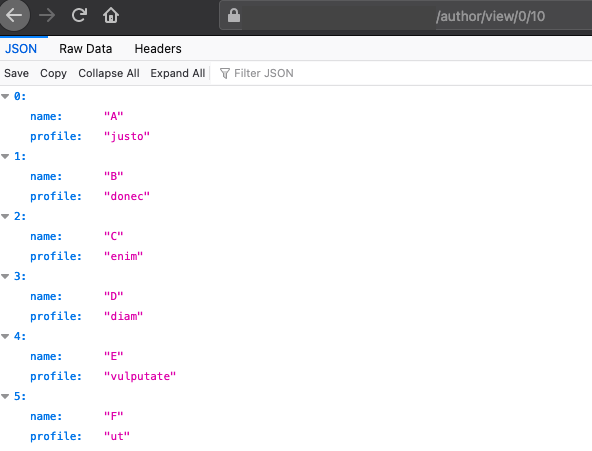
url은 author/view으로 하기로 하고, 데이터가 10개가 넘어가니까 일단 0-10범위의 데이터를 가져와서 출력해본다.
라우팅 부분에 author/view 처리를 추가해주고,
var http = require('http');
var url = require('url');
var path = require('path');
var db = require('./db');

var app = http.createServer(function(request, response){
  var _url = request.url;
  var pathname = url.parse(_url, true).pathname;
  url_parsed = pathname.split('/');

  if (url_parsed[1] === 'author' && url_parsed[2] === 'view'){
    var start = Number(url_parsed[3]);
    var end = Number(url_parsed[4]);
    if (!Number.isInteger(start) || !Number.isInteger(end)) {
      response.writeHead(404);
      response.end('Data Not Found');
    } else {
      var query = `SELECT JSON_ARRAYAGG(JSON_OBJECT('name', name, 'profile', profile)) as 'result' FROM (SELECT name, profile FROM authorTest LIMIT ? OFFSET ?)sub`;
      db.query(query, [end-start, start], function(err, data){
        if (err) { throw err };
        response.writeHead(200, { 'Content-Type': 'application/json' });
        response.end(data[0]['result']);
      })
    }
  } else {
  	response.writeHead(200);
	response.end(fs.readFileSync(__dirname + '/index.html'));   // 기본적으로는 여기
  }
});
app.listen(3000);
데이터를 확인해본다.
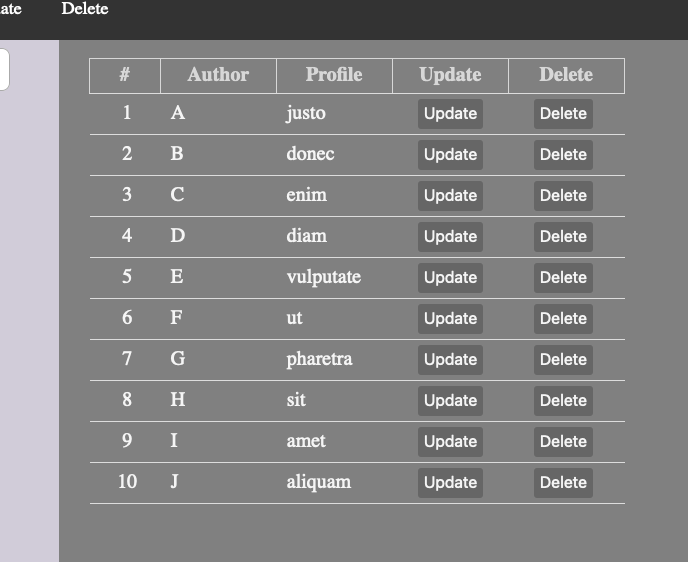
잘 나오고 있으니 fetch와 연결해서 테이블을 완성한다.
var authorPage = function(){
  fetch('author/view/0/10').then(function(response){
    response.json().then(function(data){
      var trs = ``;
      for (var i in data){
        var trs = trs + `
          <tr>
            <td class="table-idx">${Number(i)+1}</td>
            <td>${data[i]['name']}</td>
            <td>${data[i]['profile']}</td>
            <td><button class="button-edit">Update</button></td>
            <td><button class="button-edit">Delete</button></td>
          </tr>`;
      }
      var table =  `
        <table class="author-table" border=2>
          <th class="table-idx">#</th>
          <th>Author</th>
          <th>Profile</th>
          <th>Update</th>
          <th>Delete</th>
          ${trs}
        </table>`;
      document.querySelector('.right').innerHTML = table;
    });
  });
};
잘 나오는지 확인해본다.
이제 위의 fetch URL에서 0을 26으로 늘리면 데이터가 끝까지 나온다.

다 좋은데 스크롤이 길어져서 페이지를 추가해주는 게 좋지 않을까 고민하다가
페이스북 뉴스피드 스타일의 무한스크롤은 어떨까 하는 생각이 들었다.
load more data on scroll javascript라고 검색해서 유용한 글을 찾아냈다: [JS] JQuery 를 사용한 무한 스크롤 (Infinite Scroll) 예제
다행히도 JQuery를 사용하지 않는 기본 자바스크립트 예제 코드가 있었다.
윈도우의 스크롤을 감지해서 스크롤바가 끝에 도달하면 html을 추가하는 방식이라고 한다.
window.onscroll = function() {
  if ((window.innerHeight + window.scrollY) >= document.body.scrollHeight) {
    authorPage();
  }
};

// 이후 이슈가 발생해서 document.body.offsetHeight를 scrollHeight으로 수정했다.
처음 화면 크기가 커서 스크롤바가 생기지 않는 부분의 예제는 JQuery밖에 없어서 원리만 참조했다.
아래의 경우 화면 길이에 스크롤이 내려온 만큼을 더했을 때, (늘어난) body 높이와 같아지면 스크롤바가 끝까지 내려온 것이다.
window.innerHeight === document.body.scrollHeight스크롤바가 없는 경우, 맨처음 로딩 분량에 더해서 스크롤이 생기는 분량까지 추가 데이터를 로드하기로 했다.
function repeat(){   // 반복이 아니라 if 조건이 달성될 때까지 반복이라서 i는 생략했다.
  setTimeout(function() {
    if (condition){   // 스크롤이 아직 없는지, 추가 데이터 로드가 필요한지 확인하고
      repeat();       // 필요하면 재귀를 돌리고
    } else {    // 아니면 종료
      window.addEventListenr("scroll", authorPage);
      return 0;
    }
  authorPage());  // 위의 if else문에서 종료되지 않았으니 데이터를 로드한다.
  }, 500);
};
repeat();
그러면 이제 authorPage 함수는 2가지 역할을 해야한다.
첫 번째는 위에서 실행했던, 조회하는 author의 id가 0에서 시작하면 테이블을 만들고 해당 데이터를 얹어서 출력하는 작업이고,
두 번째는 스크롤바가 끝에 도달해서 실행하는 경우, 기존의 테이블에 새로운 데이터를 추가해서 출력하는 작업이다.
그냥 innerHTML replace 해서는 수정이 안 돼서 기존의 테이블에 데이터를 추가하는 데 어려움을 겪었다.
아무래도 table 자체를 받아와서 편집을 해야할 것 같다는 생각이 들어서 검색을 해보니, 이런 글이 있다.
자바스크립트에서 테이블을 생성하는 팁에 관한 글이다. 댓글 중에 DocumentFrgament를 사용하라는 이야기가 있어서 검색을 해보니,
역시 MDN에 예제가 있다. developer.mozilla.org/en-US/docs/Web/API/DocumentFragment
var list = document.querySelector('#list')
var fruits = ['Apple', 'Orange', 'Banana', 'Melon']

var fragment = new DocumentFragment()

fruits.forEach(function (fruit) {
  var li = document.createElement('li')  // 태그 생성
  li.innerHTML = fruit                   // value 지정
  fragment.appendChild(li)               // 부모태그에 자식으로 등록
})

list.appendChild(fragment)
이걸 응용해서 테이블 작성법을 변경했다.
var authorPage = function(more){
  if (more === undefined){   // 추가될 분량을 지정하지 않은 경우, 맨처음이니까
    more = 15;
    var start = 0;           // 인덱스 0에서 시작
  } else {                   // 그렇지 않으면 테이블 마지막 줄에서 지정해둔 id 가져오기
    var start = document.getElementById("last-author").innerHTML;
  }
  fetch(`author/view/${start}/${more}`).then(function(response){
    response.json().then(function(data){
      if (start === 0){    // 인덱스가 0인 경우 테이블을 만들어야 한다.
        var table = document.createElement('table');
        table.setAttribute('id', 'author-table');
        table.setAttribute('border', '2');
        const idx = document.createElement('th');
        idx.setAttribute('class', 'table-idx');
        idx.innerHTML = '#';
        table.appendChild(idx);
        const thlist = ['Author', 'Profile', 'Update', 'Delete'];
        for (var i in thlist){
          const cell = document.createElement('th');
          cell.innerHTML = thlist[i];
          table.appendChild(cell);   // th 추가
        }
      } else {            // 그렇지 않으면 이미 있는 테이블을 가져온다.
        var table = document.getElementById('author-table');
      }
      for (var i in data){
        const rowsFragment = document.createDocumentFragment();  // 줄 Fragment
        const row = document.createElement("tr");   // 줄 tag
        const cell1 = document.createElement("td");  // td1
        cell1.setAttribute('class', 'table-idx');
        if (data[i] === data[data.length-1]){
          cell1.setAttribute('id', 'last-author')
        };
        cell1.innerHTML = ++start;
        // 여기는 테이블 column 1번에 위치하는 인덱스, 0에서 시작하는데 1번부터 출력해줘야 해서 ++
        const cell2 = document.createElement("td");   // td2
        cell2.innerHTML = data[i]['name'];
        const cell3 = document.createElement("td");   // td3
        cell3.innerHTML = data[i]['profile'];
        const cell4 = document.createElement("td");   // td4
        const button1 = document.createElement("button");
        button1.setAttribute('class', 'button-edit');
        button1.innerHTML = 'Update';
        cell4.appendChild(button1);
        const cell5 = document.createElement("td");   // td5
        const button2 = document.createElement("button");
        button2.setAttribute('class', 'button-edit');
        button2.innerHTML = 'Delete';
        cell5.appendChild(button2);
        row.appendChild(cell1);    // 정리는 뒤에서
        row.appendChild(cell2);
        row.appendChild(cell3);
        row.appendChild(cell4);
        row.appendChild(cell5);
        rowsFragment.appendChild(row);   // 줄 Fragment에 줄 자식으로 넣어주고
        table.appendChild(rowsFragment);  // 테이블에도 넣어주고
      };
      document.querySelector('.right').innerHTML = ``;   // innerHTML 초기화한 다음에
      document.querySelector('.right').appendChild(table);  // 자식으로 등록
    });
  });
};
이제 초기실행인 경우와 스크롤바가 끝에 도달해서 실행하는 경우 모두 처리할 수 있게 됐으니, onscroll에 이 함수를 넣어주고 테스트를 해본다. 얼마나 더 가져올 것인가에서 more을 받기로 했으니 authorPage(10)처럼 넣어준다.
window.onscroll = function() {
  if ((window.innerHeight + window.scrollY) >= document.body.offsetHeight) {
    authorPage(10);
  }
};
그리고 실행을 해보니, 스크롤하면 추가가 되는데 뭔가 이상하다.
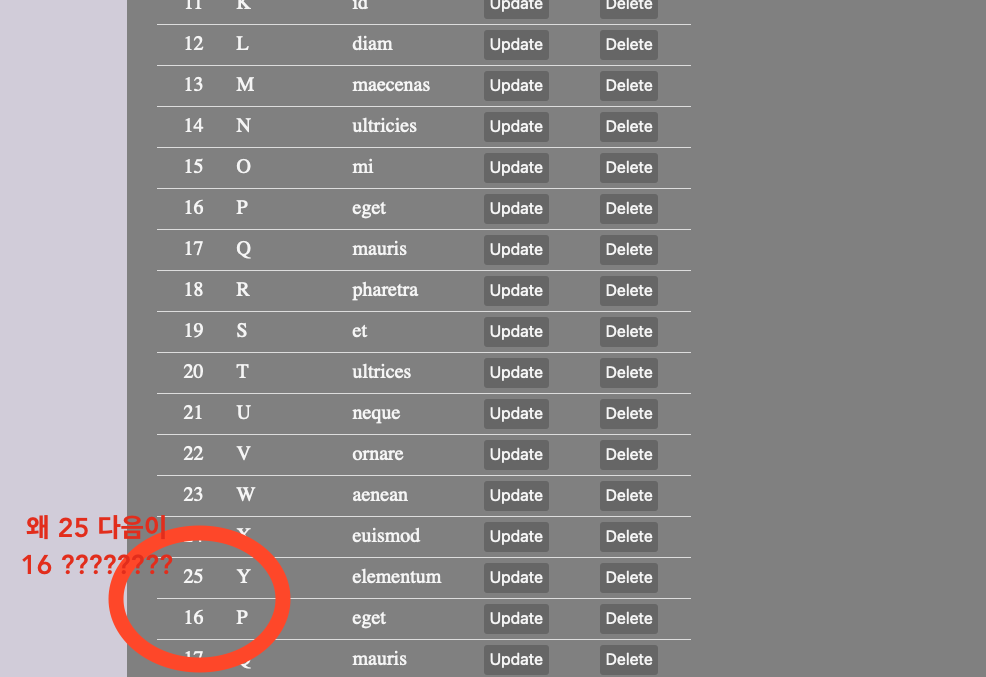
25가 나왔으면 이제 26이 나와야 하는데 갑자기 16이 나오고, 이대로 무한히 반복된다. 26이 나오지 않는다.
코드가 의도대로 작동했다면 id가 last-author인 태그를 가져왔을 거고, 그러면 25 다음에는 26이 왔어야 한다.
하지만 25 다음에 다시 16이 왔으니 authorPage()가 여러 번 실행되었든지, 혹은 last-author가 15에서 25로 변경되지 않은 듯하다.
살펴보니 위에서 cell1.setAttribute('id', 'last-author')를 실행하고 removeAttribute를 하지 않았다.
한 페이지에서 아이디가 중복해서 등장했으니 처음 등장한 id인 15가 계속 참조된 것이다.
처음 if else 구문에서 document.getElementById("last-author")를 가져오는 부분에, 가져온 다음 id를 지워주는 코드를 추가한다.
} else {
  var start = document.getElementById("last-author").innerHTML;
  document.getElementById("last-author").removeAttribute("id");
}
이제 의도대로 스크롤바 맨 끝에서 db 조회가 완료된다.
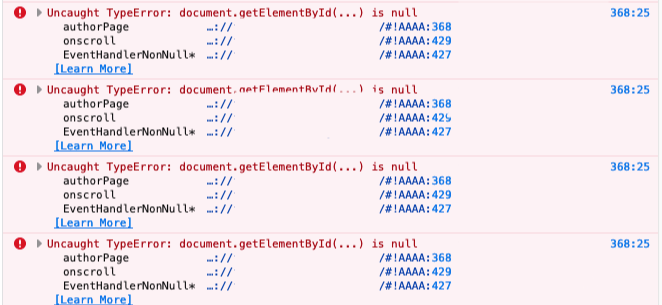
그런데 다른 문제가 있다. 네트워크 부분에서 getElementById가 실패했다는 문구가 계속 뜬다.
368줄은 위의 var start = document.getElementById("last-author").innerHTML; 라인이다.
저자목록 로딩이 완료된 이후에도 스크롤바가 바닥에 닿으면 계속 authorPage()를 계속 실행하고 있다.
authorPage에서 한번 로딩이 끝나면 추가로 로드하는 일이 없도록 변경한다.
맨 마지막에 document.querySelect('.right') 아래에 아래 코드를 추가했다.
data는 API에서 받아온 데이터인데, 항목이 more보다 작으면 끝까지 가져온 것이므로 loaded 메세지를 출력한다.
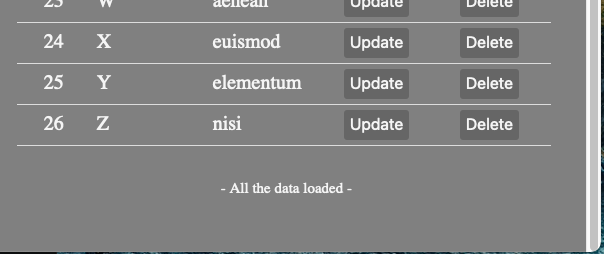
if (data.length < more){
  const loaded = document.createElement("p");
  loaded.innerHTML = '- All the data loaded -';
  loaded.setAttribute('class', 'loaded');
  document.querySelector('.right').appendChild(loaded);
};
/*CSS*/ .loaded { text-align: center; padding: 20px; color: whitesmoke; font-size: 15px; }혹시 데이터가 more 기준과 똑같이 끝나는 경우,
(ex 15, 10, 10개씩 출력했는데 마침 데이터가 35개가 있어서 data.length < more에 걸리지 않아 loaded가 설정되지 않은 경우)
그 이후 또 API를 요청하면 데이터가 없어서 null이 반환되므로 main.js의 해당 부분에 null 에러처리를 추가했다.
데이터가 없는 경우 data.length에서 0이 되므로 loaded 메시지는 정상적으로 출력된다.
} else if (url_parsed[1] === 'author' && url_parsed[2] === 'view'){
  var start = Number(url_parsed[3]);
  var more = Number(url_parsed[4]);
  if (!Number.isInteger(start) || !Number.isInteger(more)) {
    response.writeHead(404);
    response.end('Data Not Found');
  } else {
    var query = `SELECT JSON_ARRAYAGG(JSON_OBJECT('name', name, 'profile', profile)) as 'result' FROM (SELECT name, profile FROM authorTest LIMIT ? OFFSET ?)sub`;
    db.query(query, [more, start], function(err, data){
      response.writeHead(200, { 'Content-Type': 'application/json' });
      var result = data[0]['result'];
      if (result === null){   // 데이터가 null인 경우
        result = JSON.stringify([]);  // 포맷에 맞춰서 빈 데이터 출력, 이렇게 되면 data.length === 0
      }
      response.end(result);
    })
  }
}
그리고 스크롤바 핸들링 부분에서 'loaded'라는 아이디가 없을 때만 authorPage를 실행하도록 수정한다.
window.onscroll = function() {
  if ((window.innerHeight + window.scrollY) >= document.body.offsetHeight) {
    if (document.querySelector('.loaded') === null){  // loaded가 없을 때만 실행
      authorPage(10);
    }
  }
};
이제 네트워크의 null 오류도 사라졌고, 추가 로딩이 없어지고 의도대로 메시지도 출력된다.
-수정된 authorPage()-
더보기var authorPage = function(more){ var loadDB = function (more, start) { if (start === 0){ var table = document.createElement('table'); table.setAttribute('id', 'author-table'); var idx = document.createElement('th'); idx.setAttribute('class', 'table-idx'); idx.innerHTML = '#'; table.appendChild(idx); var thlist = ['Author', 'Profile', 'Update', 'Delete'] for (var i in thlist){ var cell = document.createElement('th'); cell.innerHTML = thlist[i]; table.appendChild(cell); } } else { var table = document.getElementById('author-table'); } fetch(`author/view/${start}/${more}`).then(function(response){ response.json().then(function(data){ for (var i in data){ const rowsFragment = document.createDocumentFragment(); const row = document.createElement("tr"); const cell1 = document.createElement("td"); cell1.setAttribute('class', 'table-idx'); if (data[i] === data[data.length-1]){ cell1.setAttribute('id', 'last-author') }; cell1.innerHTML = ++start; const cell2 = document.createElement("td"); cell2.innerHTML = data[i]['name']; const cell3 = document.createElement("td"); cell3.innerHTML = data[i]['profile']; const cell4 = document.createElement("td"); const button1 = document.createElement("button"); button1.setAttribute('class', 'button-edit'); button1.innerHTML = 'Update'; cell4.appendChild(button1); const cell5 = document.createElement("td"); const button2 = document.createElement("button"); button2.setAttribute('class', 'button-edit'); button2.innerHTML = 'Delete'; cell5.appendChild(button2); row.appendChild(cell1); row.appendChild(cell2); row.appendChild(cell3); row.appendChild(cell4); row.appendChild(cell5); rowsFragment.appendChild(row); table.appendChild(rowsFragment); }; document.querySelector('.right').innerHTML = ``; document.querySelector('.right').appendChild(table); if (data.length < more){ const loaded = document.createElement("p"); loaded.innerHTML = '- All the data loaded -'; loaded.setAttribute('class', 'loaded'); document.querySelector('.right').appendChild(loaded); }; }); }); } if (more === undefined){ more = 15; var start = 0; return loadDB(more, start); } else { var lastAuthor = document.getElementById("last-author") if (lastAuthor === null){ return false; } else { var start = lastAuthor.innerHTML; lastAuthor.removeAttribute("id"); return loadDB(more, start); } }; }Create - Layout
Read가 구현되었으니 Create 부분을 만든다. 데이터를 생성하려면 먼저 입력할 수 있는 폼이 있어야 하니, 폼을 만들어야 한다.
폼을 출력해줄 버튼이 필요하고, 그 폼에서는 name과 profile 2가지를 받으면 된다. 위치는 맨위가 좋겠다.
authorPage()에서 테이블을 생성할 때 레이아웃에 추가하기로 하고, 함수가 복잡해지니까 레이아웃 부분을 layout()으로 분리한다.
var tableLayout = function(){
  var table = document.createElement('table');
  table.setAttribute('id', 'author-table');
  var idx = document.createElement('th');
  idx.setAttribute('class', 'table-idx');
  idx.innerHTML = '#';
  table.appendChild(idx);
  var thlist = ['Author', 'Profile', 'Update', 'Delete']
  for (var i in thlist){
    var cell = document.createElement('th');
    cell.innerHTML = thlist[i];
    table.appendChild(cell);
  }
  const div = document.createElement("div");  // div 태그
  div.setAttribute('class', 'author-edit-area');
  const create = document.createElement("button");  // 버튼
  create.innerHTML = "Create";
  create.setAttribute('class', 'button-edit');
  div.appendChild(create);
  document.querySelector('.right').innerHTML = ``;   // 초기화 후
  document.querySelector('.right').appendChild(div);  // div와 table 추가
  document.querySelector('.right').appendChild(table);
  return table;
}
// authorPage()안의 함수 var loadDB = function (more, start) { if (start === 0){ var table = tableLayout(); // 여기서 테이블 생성 } else { var table = document.getElementById('author-table'); } fetch(`author/view/${start}/${more}`).then(function(response){ response.json().then(function(data){ // 테이블 데이터 생성 부분 }; table.replaceWith(table); // innerHTML에서 replace로 교체 if (data.length < more){ const loaded = document.createElement("p"); loaded.innerHTML = '- All the data loaded -'; loaded.setAttribute('class', 'loaded'); document.querySelector('.right').appendChild(loaded); }; }); }); }CSS까지 넣으니 폼이 들어갈 위치가 잡혔다.
.author-edit-area {
  min-height: 100px;
  width: 100px;
}
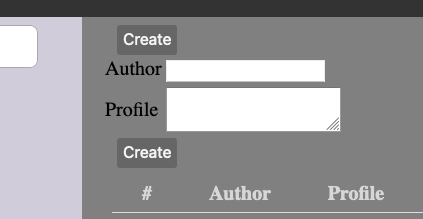
먼저 폼을 생성한다. Author와 Profile이 화면 크기에 따라서 세로 혹은 가로로 정렬되기를 바라서 li 태그로 감쌌다. 그리고 Create의 onclick에 연결해준다.
var createForm = function (){
  var form = document.createElement("form");
  form.setAttribute("charset", "UTF-8");
  form.setAttribute("class", "author-form")
  form.setAttribute("method", "Post");
  form.setAttribute("action", "/author/create");   // 전송할 url

  var list = document.createElement('ul');
  var arr = ['Author', 'Profile']
  for (var item in arr){
    const li = document.createElement("li");
    const label = document.createElement("span");
    label.innerHTML = arr[item];
    const input = document.createElement("input");
    input.setAttribute("type", "text");
    input.setAttribute("name", arr[item]);
    li.appendChild(label);
    li.appendChild(input);
    list.appendChild(li);
  };

  const submit = document.createElement("input");
  submit.setAttribute("type", "submit");
  submit.setAttribute("value", "Create");
  submit.setAttribute("class", "button-edit");
  form.appendChild(list);
  form.appendChild(submit);
  var div = document.querySelector('.author-edit-area');
  div.appendChild(form);
}
var tableLayout = function (){ var table = document.createElement('table'); table.setAttribute('id', 'author-table'); // td, th, tr 생성 부분 const div = document.createElement("div"); div.setAttribute('class', 'author-edit-area'); const create = document.createElement("button"); create.innerHTML = "Create"; create.setAttribute('class', 'button-edit'); create.setAttribute('onclick', 'createForm();'); // onclick에 추가 div.appendChild(create); document.querySelector('.right').innerHTML = ``; document.querySelector('.right').appendChild(div); document.querySelector('.right').appendChild(table); return table; }이제 Create를 누르면 아래에 폼이 생긴다.
그런데 Create 버튼이 2개라 헷갈린다. 누르면 위의 Create는 안 보이게 처리한다.
// tableLayout()
  create.setAttribute('onclick', 'createForm(this);');  // 여기서 this를 넘기고

var createForm = function (createButton){
  createButton.style.display = 'none';  // 여기에 비활성화를 추가한다
}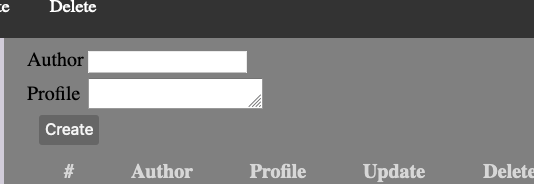
Create의 위치가 실행전/후가 같은 위치였으면 좋겠다. 둘다 author-edit-area의 자식태그인 점을 이용해서 위치를 지정한다.
.author-edit-area {
  min-height: 50px;
  padding: 20px 0 0 0;
  margin: 0;
}
.author-edit-area button, .author-edit-area .button-edit {
  float: right;
  margin: 0 5px 0 0;
}
.author-edit-area ul {
  display: inline;
  margin: 0;
  padding: 0;
}
.author-edit-area ul li {
  display: inline;
  padding: 0;
  margin: 0;
}
.author-edit-area span {
  padding: 0 10px 0 25px;
}
이제 Create 클릭 전/후로 같은 자리에 버튼이 위치한다.

Create - Fetch API post method
폼이 완성되었으니 액션을 처리해야 하는데, 주제가 SPA니까 URL 이동 없이 데이터 입력을 처리해야한다.
먼저 fetch API로 form의 post 메소드를 어떻게 처리하면 되는지 찾아보았다.
이런 글을 찾았다: how-to-use-fetch-to-post-form-data-as-json-to-your-api-2pih
폼에 액션 대신에 이벤트 리스너를 추가하고, 리스너에서 데이터를 받아와서 처리하면 된다!
/* REF https://dev.to/simonplend/how-to-use-fetch-to-post-form-data-as-json-to-your-api-2pih */

var form = document.querySelector('author-form');
form.addEventListener("submit", createAuthor);

async function createAuthor(event){
  event.preventDefault();  // 기본으로 실행되는 submit 액션 취소, 아마 URL로 이동인 것 같다
  const form = event.currentTarget;  // 현재 다루고 있는 핸들대상, 이벤트 핸들러 안에서만 사용 가능하다, 내 경우에는 폼 객체!
  const url = form.action;   // 원래 폼이 보내기로 돼있는 action URL
  try {
    const formData = new FormData(form);
    const responseData = await postFormDataAsJson({url, formData});
    // 데이터가 정상적으로 입력되었으면 responseData가 반환된다
  } catch(err){
    console.error(err);
  }
}
실제 폼 데이터는 위의 form을 파싱해서 얻을 수 있다.
const formData = new FormData(form);  // 새로운 폼 데이터 생성
const plainFormData = Object.fromEntries(formData.entries());
// FormData.entries()는 여기 담긴 모든 키/밸류 쌍을 순회할 수 있는 iterator를 반환
// Object.fromEntries()로 iterator를 객체로 변환
const formDataJsonString = JSON.stringify(plainFormData); // JSON 형태로 변환
이 formData를 action에서 지정한 URL로 보내면 프론트에서 필요한 데이터 전달은 끝난다.
/* REF https://dev.to/simonplend/how-to-use-fetch-to-post-form-data-as-json-to-your-api-2pih */

const fetchOptions = {
  method: "POST",  // 디폴트 메소드가 GET이라서 꼭 POST라고 명시가 필요함
  headers: {
  "Content-Type": "application/json",
  "Accept": "application/json"
  },
  body: formDataJsonString
};

const response = await fetch(url, fetchOptions);
이제는 백엔드로 가서, action URL에서 request에서 데이터를 받은 다음,
// request, response 라우팅 함수 중 author/create URL 처리 부분
var body = '';
request.on('data', function(data){ //
  body += data;
try {
  var dataJSON = JSON.parse(data);
} catch(err) {
  console.error(err);
}
중복되는 저자명이 없으면 db에 INSERT INTO을 하고, 이미 있는 이름이면 경고창을 띄워야한다.
혹은 아래에 중복된 저자명입니다라고 Author 아래에 문구를 출력해줘도 좋겠다.
에러처리를 위해 이슈를 객체에 담아서 보내기로 한다.
// 라우팅 함수
} else if (url_parsed[1] === 'author' && url_parsed[2] === 'create'){
  var body = '';
    request.on('data', function(data){
    body += data;
  try {
    var dataJSON = JSON.parse(data);
  } catch(err) {
    console.error(err);
  }
  if (dataJSON['Author'] === '') {
    var msg = { result: false,
                error: 'empty'   // 에러 반환
              }
    response.writeHead(200, {'Content-Type': 'application/json'});
    response.end(JSON.stringify(msg));  // msg 전달해서 이후에 처리
  } else {
    db.query('SELECT EXISTS(SELECT * FROM authorTest WHERE name = ?) AS dup;', dataJSON['Author'], function(err1, result1){
    if (err1) {throw err1};
    if (result1[0].dup === 0){  // 같은 이름이 없으면
      var query = `INSERT INTO authorTest (name, profile) VALUES (?, ?)`;  // 데이터입력
      db.query(query, [dataJSON['Author'], dataJSON['Profile']], function(err2, result2){
        if (err2) {throw err2};
          var msg = { result: true,
                      authorID: result2.insertId   // 입력 아이디 반환
                    }
          response.writeHead(200, {'Content-Type': 'application/json'});
          response.end(JSON.stringify(msg));  // msg 전달해서 이후에 처리
      })
    } else {   // 있으면
      var msg = { result: false,
                  error: 'duplicated'  // 에러 반환
                }
      response.writeHead(200, {'Content-Type': 'application/json'});
      response.end(JSON.stringify(msg));  // msg 전달해서 이후에 처리
    }
    });
  }
  });
}
이제 다시 createAuthor() 함수로 되돌아가서 response를 처리한다. responseData를 받은 다음에
const responseData = await postFormDataAsJson({url, formData});
isInsertDone(responseData);
success, duplicated, empty에 따라서 메시지를 출력할 수 있도록 수정했다.
var isInsertDone = function (responseData){
  var editErea = document.querySelector('.author-edit-area');
  if (document.querySelector('.insert-msg') === null){
    var msg = document.createElement("p");
    msg.setAttribute('class', 'insert-msg');
  } else {
    var msg = document.querySelector('.insert-msg');
  }
  const success = responseData.result;
  if (success) {
    const authorID = responseData.authorID;
    msg.innerHTML = 'Thank You. Your data has been processed successfully.';
  } else {
    const error = responseData.error;
    if (error === 'duplicated'){
      msg.innerHTML = 'Your Author name already exists ... ';
    } else if (error === 'empty'){
      msg.innerHTML = 'Please type Author Name ... ';
    }
  }
  editErea.appendChild(msg);
}
아무것도 입력하지 않고 Create를 누른 경우, 아래처럼 안내메시지가 출력된다.
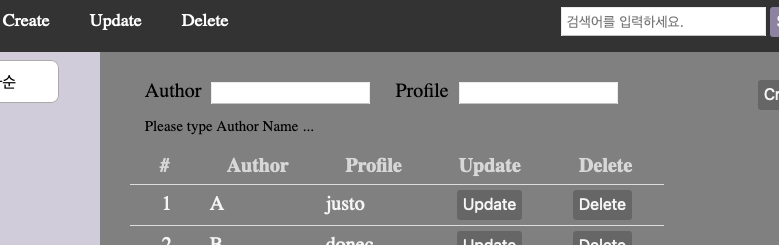
그런데 이 메시지가 언제 생긴 건지 확인이 안 돼서, 누를 때마다 색깔이 바뀌었으면 좋겠다. 컬러를 두 가지 고르고, 토글하기로 했다.
appendChild 전에 아래 구문을 추가한다.
if (msg.style.color === 'rgb(254, 231, 244)'){
  msg.style.color = 'rgb(240, 197, 211)';
} else {
  msg.style.color = 'rgb(254, 231, 244)';
}
editErea.appendChild(msg);

이제 버튼을 누를 때마다 메시지 색이 변경된다.
Update
생성이 끝났으니 갱신을 할 수 있게 되었다. Update에서 Create의 폼을 그대로 사용하되, 공란이 아니라 업데이트를 클릭한 author의 데이터를 불러와서 갱신할 수 있도록 해야한다.
먼저 아래의 author에서 Update 버튼을 누르면 데이터를 불러오도록 해야한다.
데이터를 받아오는 함수를 추가한 다음
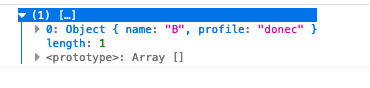
var loadAuthor = function (start){
  fetch(`author/view/${start}/1`).then(function(response){
  // start는 offset 위치에 들어갈 줄번호고, 수정대상 1건만 조회할 것이라 개수는 1로 했다.
    response.json().then(function(data){
      console.log(data);
    });
  });
}
authorPage() 중 버튼을 만드는 함수에 onclick 속성을 추가하고 잘 전송되나 확인해본다.
button1.setAttribute('onclick', `loadAuthor(${start-1})`);
// start는 줄번호로 #컬럼에 들어가는 데이터
여기서 2번 행의 B를 누르니 콘솔에
아래처럼 데이터가 전달되고 있는 것을 확인할 수 있다. 이제 이걸 폼에 넣어서 출력하면 된다.
이미 기존에 Create 작업을 할 때 createForm 함수로 폼을 만들었으니, 그 함수를 재활용하기로 한다.
업데이트를 하려면 name이 변경될 수 있으니 id를 가져와야 하는데, 기존에 id를 안 가져왔었다. 먼저 API에서 id를 가져오도록 수정하고,
var query = `SELECT JSON_ARRAYAGG(JSON_OBJECT('id', id, 'name', name, 'profile', profile)) as 'result' FROM (SELECT id, name, profile FROM authorTest LIMIT ? OFFSET ?)sub`;가져오는 쿼리문을 수정했다. 데이터가 잘 가져와지는지 확인했으니,
createForm을 수정한다. create/update 양쪽에서 호출하게 될 거라서 함수명도 적절하게 변경했다.
var authorForm = function (option){  // 기존에 버튼을 받던 걸 객체로 변경했다
  document.getElementById('author-create').style.display = 'none';    // 기존 Create 버튼은 id를 줘서 아이디로 없앤다.
  const process = option['process'].charAt(0).toUpperCase() + option['process'].slice(1);  // capitalize
  if (option['process'] === 'create'){    // 작업에 따라 인풋부분에 들어갈 텍스트를 변경
    var texts = Array(2).fill('');
  } else if (option['process'] === 'update'){
    var texts = [option['name'], option['profile']];
  }
  var form = document.createElement("form");
  form.setAttribute("charset", "UTF-8");
  form.setAttribute("class", "author-form")
  form.setAttribute("method", "Post");
  form.setAttribute("action", '/author/' + option['process']);   // 전송할 url도 작업에 따라 변경

  var list = document.createElement('ul');

  const li = document.createElement("li");  // hidden id값 입력
  const input = document.createElement("input");
  input.setAttribute("type", "hidden");
  input.setAttribute("name", "id");
  input.setAttribute("value", option['id']);
  li.appendChild(input);
  list.appendChild(li);

  var arr = ['Author', 'Profile']
  for (var item in arr){
    const li = document.createElement("li");
    const label = document.createElement("label");
    label.innerHTML = arr[item];
    const input = document.createElement("input");
    input.setAttribute("type", "text");
    input.setAttribute("name", arr[item]);
    input.setAttribute("value", texts[item]);    // 여기서 value를 지정해준다
    li.appendChild(label);
    li.appendChild(input);
    list.appendChild(li);
  };

  const submit = document.createElement("input");
  submit.setAttribute("type", "submit");
  submit.setAttribute("value", process);   // 버튼명도 변경
  submit.setAttribute("class", "button-edit");
  form.appendChild(list);
  form.appendChild(submit);
  var div = document.querySelector('.author-edit-area');
  form.addEventListener("submit", authorHandler);
  // 데이터는 똑같이 전송되니까 리스너는 재활용하면 되는데 createAuthor면 이름이 헷갈리니까 함수 이름만 바꿨다.
  div.appendChild(form);
}
함수가 변경되었으니 기존에 createForm를 호출했던 부분들도 맞춰서 수정해주고, create 버튼에 id도 주고
const create = document.createElement("button");
create.innerHTML = "Create";
create.setAttribute('class', 'button-edit');
create.setAttribute('id', 'author-create');
create.setAttribute('onclick', `authorForm({process: 'create'});`);
loadAuthor에도 연결한다.
var loadAuthor = function (start){
  fetch(`author/view/${start}/1`).then(function(response){
  response.json().then(function(data){
    var option = {
      process: 'update',
      id: data[0]['id'],
      name: data[0]['name'],
      profile: data[0]['profile']
    }
    authorForm(option);
    });
  });
}
그러고나서 Update 버튼을 눌러보니 잘 나오는데 한 가지 문제가 있다.
버튼을 누르는 만큼 편집창이 계속 추가된다. 아무래도 authorForm을 만들때, 버튼말고 .author-edit-area 부분을 초기화해주는 편이 좋겠다. 위의 authorForm에서 Create 버튼 display: none 부분을 .author-edit-area 초기화로 변경한다.
var authorForm = function (option){
  document.querySelector('.author-edit-area').innerHTML = '';  // 편집영역 초기화
  // 나머지
}
이제 프론트엔드 부분은 완성됐으니 백엔드에서 author/update를 처리한다. 기존 create에서 달라지는 부분만 수정했다.
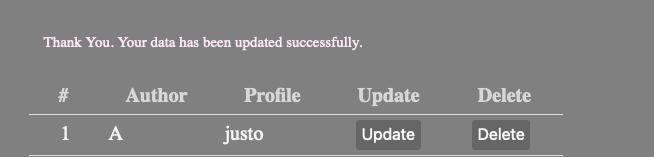
} else if (url_parsed[1] === 'author' && url_parsed[2] === 'update'){
  var body = '';
  request.on('data', function(data){  // 데이터 받아오기
    body += data;
    try {
      var dataJSON = JSON.parse(data);
    } catch(err) {
      console.error(err);
    }
    if (dataJSON['Author'] === '') {  // 이름이 없으면
      var msg = { result: false,
                  status: 'empty'
                }
      response.writeHead(200, {'Content-Type': 'application/json'});
      response.end(JSON.stringify(msg));
    } else {
      db.query('SELECT EXISTS(SELECT * FROM authorTest WHERE name = ? AND id != ?) AS dup;', [dataJSON['Author'], dataJSON['id']], function(err1, result1){
        if (err1) {throw err1};
        if (result1[0].dup === 0){  // 같은 이름이 없으면
          var query = `UPDATE authorTest SET name=?, profile=? WHERE id=?`;
          db.query(query, [dataJSON['Author'], dataJSON['Profile'], dataJSON['id']], function(err2, result2){
            if (err2) {throw err2};
            var msg = { result: true,
                        authorID: result2.insertId,
                        status: 'updated'
                      }
            response.writeHead(200, {'Content-Type': 'application/json'});
            response.end(JSON.stringify(msg));
          })
        } else {
          var msg = { result: false,
                      status: 'duplicated'
                    }
        response.writeHead(200, {'Content-Type': 'application/json'});
        response.end(JSON.stringify(msg));
        }
      });
    }
  });
}
그리고 isInsertDone 부분에서 status에 따라서 처리하도록 수정한다. 성공적이라면 결과를 리로드할 수 있도록, result가 true면 authorPage()를 다시 호출했다.
var isInsertDone = function (responseData){
  const success = responseData.result;
  if (success) {
    authorPage();  // 갱신하면 페이지를 새로 만들기 때문에 아래에서 editErea 처리하기 이전에 실행해야한다
  }
  var editErea = document.querySelector('.author-edit-area');
  if (document.querySelector('.insert-msg') === null){
    var msg = document.createElement("p");
    msg.setAttribute('class', 'insert-msg');
  } else {
    var msg = document.querySelector('.insert-msg');
  }
  // 나머지 status 관련 처리
  editErea.appendChild(msg);
}
이제 데이터를 업데이트하고나면 이렇게 위에 메시지가 출력된다.
Delete
Delete도 위의 Create, Update와 마찬가지로 authorHandler()를 재활용해서 처리할 것이라서 먼저 백엔드 부분을 추가했다.
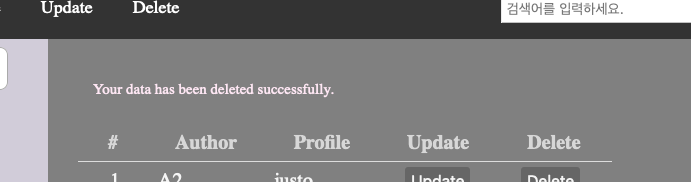
} else if (url_parsed[1] === 'author' && url_parsed[2] === 'delete'){
  var body = '';
  request.on('data', function(data){  // 데이터 받아오기
    body += data;
    try {
      var dataJSON = JSON.parse(data);
    } catch(err) {
      console.error(err);
    }
    db.query('DELETE FROM authorTest WHERE id=?', dataJSON.id, function(err, result){
      if (err) {throw err};
      var msg = { result: true,   // 마찬가지로 완료메시지 전송
                  status: 'deleted'
                }
      response.writeHead(200, {'Content-Type': 'application/json'})
      response.end(JSON.stringify(msg));
    });
  });
}
Delete는 그냥 버튼이 아니라 form이어야 하기 때문에 authorPage()에서 기존에 Delete 버튼을 만들었던 부분을 Form으로 변경하고
const cell5 = document.createElement("td");
var deleteForm = document.createElement("form");
deleteForm.setAttribute("method", "Post");
deleteForm.setAttribute("action", '/author/delete');
const deleteID = document.createElement("input");
deleteID.setAttribute("type", "hidden");
deleteID.setAttribute("name", "id");
deleteID.setAttribute("value", data[i]['id']);
deleteForm.appendChild(deleteID);
const deleteSubmit = document.createElement("input");
deleteSubmit.setAttribute("value", 'Delete');
deleteSubmit.setAttribute('class', 'button-edit');
deleteSubmit.setAttribute("type", "submit");
deleteForm.addEventListener("submit", authorHandler);
deleteForm.appendChild(deleteSubmit);
cell5.appendChild(deleteForm);
authorHandle() 작업이 모두 완료되면 메세지를 보내는 함수에도 delete에 해당하는 부분을 추가한다.
} else if (status === 'deleted'){
  msg.innerHTML = 'Your data has been deleted successfully.';
}
그리고 Delete를 눌러보면 무사히 삭제되는 걸 확인할 수 있다.
그런데 누르면 바로 삭제가 되어서 confirm을 한번 해주는 게 좋을 것 같다. 확인이 되지 않아서 좀 불편하다. 지금 이벤트리스너를 통해 처리하고 있는 상태니까
deleteForm.addEventListener("submit", authorHandler);authorHandler에 앞서서 confime 부분을 처리해줄 새로운 이벤트 핸들러를 하나 만들어준다.
확인을 누른 경우에만 authorHandler로 보낸다.
async function reallyDelete(event){
  event.preventDefault();
  var answer = confirm('Do you want to delete this file?');
  if (answer){
    authorHandler(event);
  }
}
잘 작동하나 테스트를 해본다.
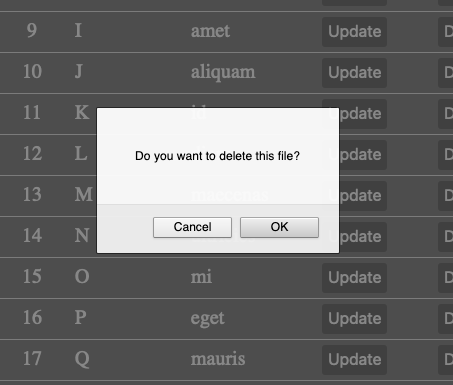
OK를 누른 경우에만 삭제가 진행된다. 의도대로 변경이 완료됐다.
코드 분리
기능을 계속 추가하다보니 index.html이 복잡해져서 CSS와 Script를 분리했다.
원래 있던 자리에는 링크를 두고
<head>
  <link rel="stylesheet" type="text/css" href="public/style.css">
  <script src="public/AuthorTable.js"></script>
  <script src="public/left.js"></script>
</head>
main.js에서 public 폴더의 파일을 전송하도록 설정했다.
var app = http.createServer(function(request, response){
  var _url = request.url;
  var pathname = url.parse(_url, true).pathname;
  var hash = pathname.hash;
  url_parsed = pathname.split('/');

  if (url_parsed[1] === 'public' && fs.existsSync(__dirname + '/public/' + url_parsed[2])) {
    var ext = path.parse(pathname).ext.replace(".", "");
    if (ext === 'css') {
      var mime = `text/css`
    } else if (ext === 'js') {
      var mime = `application/javascript`;
    }
    response.writeHead(200, {'Content-Type': mime});
    response.end(fs.readFileSync(__dirname + '/public/' + url_parsed[2], 'utf8'));
  };
});
그리고 리팩토링을 했다.
전체 구조가 보여줄 테이블을 만드는 부분, post 데이터 받아서 처리하는 부분, 편집영역 처리하는 부분 3가지로 나눴다.
테이블을 만드는 부분
더보기var Table = { new: function(){ Table.thead(); Table.tbody(0, 15); function repeat(){ setTimeout(function() { if (document.getElementById('author-loaded') === null && window.innerHeight === document.body.scrollHeight){ repeat(); } else { window.addEventListener("scroll", Table.add, {once: true}); return 0; } Table.add(); }, 500); }; repeat(); }, add: function(){ setTimeout(function(){ if ((window.innerHeight + window.scrollY) - document.body.scrollHeight < 50) { var lastAuthor = document.getElementById('last-author'); lastAuthor.removeAttribute('id'); Table.tbody(lastAuthor.innerHTML, 10); } if (document.getElementById('author-loaded') === null){ window.addEventListener("scroll", Table.add, {once: true}); }; }, 200); }, thead: function(){ var table = document.createElement('table'); table.setAttribute('id', 'author-table'); var idx = document.createElement('th'); idx.setAttribute('class', 'table-idx'); idx.innerHTML = '#'; table.appendChild(idx); var thlist = ['Author', 'Profile', 'Update', 'Delete'] for (var i in thlist){ var cell = document.createElement('th'); cell.innerHTML = thlist[i]; table.appendChild(cell); } const div = document.createElement("div"); div.setAttribute('class', 'author-edit-area'); const create = document.createElement("button"); create.innerHTML = "Create"; create.setAttribute('class', 'button-edit'); create.setAttribute('onclick', `EditForm.get({process: 'create'});`); div.appendChild(create); document.querySelector('.right').innerHTML = ``; document.querySelector('.right').appendChild(div); document.querySelector('.right').appendChild(table); }, tbody: function(start, more){ var table = document.getElementById('author-table'); fetch(`author/view/${start}/${more}`).then(function(response){ response.json().then(function(data){ Table.loadedMSG(data.length < more); for (var i in data){ if (data[i] === data[data.length-1]){ var rowsFragment = Table.tr(start++, data[i], true); } else { var rowsFragment = Table.tr(start++, data[i], false); } table.appendChild(rowsFragment); }; }); }); }, tr: function(index, data, bool){ const rowsFragment = document.createDocumentFragment(); const row = document.createElement("tr"); const cell1 = document.createElement("td"); cell1.setAttribute('class', 'table-idx'); if (bool) { cell1.setAttribute('id', 'last-author') }; cell1.innerHTML = index+1; // 보여지는 인덱스는 1부터 시작해야함 const cell2 = document.createElement("td"); cell2.innerHTML = data['name']; const cell3 = document.createElement("td"); cell3.innerHTML = data['profile']; const cell4 = document.createElement("td"); const button1 = document.createElement("button"); button1.setAttribute('class', 'button-edit'); button1.setAttribute('onclick', `Edit.update(${index})`); button1.innerHTML = 'Update'; cell4.appendChild(button1); const cell5 = document.createElement("td"); var deleteForm = EditForm.deleteForm(data['id']); cell5.appendChild(deleteForm); for (var cell of [cell1, cell2, cell3, cell4, cell5]){ row.appendChild(cell); }; rowsFragment.appendChild(row); return rowsFragment; }, loadedMSG: function(bool){ if(bool){ if (!document.getElementById('author-loaded')){ const loaded = document.createElement("p"); loaded.innerHTML = '- All the data loaded -'; loaded.setAttribute('id', 'author-loaded'); document.querySelector('.right').appendChild(loaded); } } } }post 데이터 받아서 처리하는 부분
더보기var FetchPost = { /* REF https://dev.to/simonplend/how-to-use-fetch-to-post-form-data-as-json-to-your-api-2pih */ handler: async function(event){ event.preventDefault(); // 기본으로 실행되는 submit 액션 취소 const form = event.currentTarget; // 현재 다루고 있는 핸들대상, 이벤트 핸들러 안에서만 사용 가능하다, 내 경우에는 폼 객체! const url = form.action; // 원래 폼이 보내는 URL try { const formData = new FormData(form); const responseData = await FetchPost.postFormDataAsJson({url, formData}); FetchPost.completeMSG.get(responseData); } catch(err){ console.error(err); } }, postFormDataAsJson: async function({ url, formData }) { const plainFormData = Object.fromEntries(formData.entries()); // .entries() Returns an iterator allowing to go through all key/value pairs contained in this object. const formDataJsonString = JSON.stringify(plainFormData); const fetchOptions = { method: "POST", // 디폴트 메소드가 GET이라서 꼭 POST라고 명시가 필요함 headers: { "Content-Type": "application/json", "Accept": "application/json" }, body: formDataJsonString }; const response = await fetch(url, fetchOptions); if (!response.ok) { const errorMessage = await response.text(); throw new Error(errorMessage); } return response.json(); }, completeMSG: { get: function(responseData){ const success = responseData.result; if (success) { Table.new(); } var editErea = document.querySelector('.author-edit-area'); if (document.querySelector('.insert-msg') === null){ var msg = document.createElement("p"); msg.setAttribute('class', 'insert-msg'); } else { var msg = document.querySelector('.insert-msg'); } const status = responseData.status; if (FetchPost.completeMSG.statusMSGs.hasOwnProperty(status)) { // 메세지가 있는 프로퍼티면 msg.innerHTML = FetchPost.completeMSG.statusMSGs[status]; } FetchPost.completeMSG.colorTogle(msg, ['rgb(254, 231, 244)', 'rgb(240, 197, 211)']); editErea.appendChild(msg); }, statusMSGs: { 'created': 'Thank You. Your data has been processed successfully.', 'updated': 'Thank You. Your data has been updated successfully.', 'duplicated': 'Your Author name already exists ... ', 'empty': 'Please type Author Name ... ', 'deleted': 'Your data has been deleted successfully.' }, colorTogle: function(msg, colors){ if (msg.style.color === colors[0]){ // 색깔 토글 msg.style.color = colors[1]; } else { msg.style.color = colors[1]; } } } }편집영역 처리하는 부분
더보기var Edit = { update: function(index){ fetch(`author/view/${index}/1`).then(function(response){ response.json().then(function(data){ var option = Object.assign({process: 'update'}, data[0]); EditForm.get(option); }); }); }, delete: async function(event){ event.preventDefault(); var answer = confirm('Do you want to delete this file?'); if (answer){ FetchPost.handler(event); } } } var EditForm = { get: function(option){ document.querySelector('.author-edit-area').innerHTML = ''; // 편집영역 초기화 const process = capitalize(option['process']) // capitalize var form = document.createElement("form"); form.setAttribute("charset", "UTF-8"); form.setAttribute("class", "author-form") form.setAttribute("method", "Post"); form.setAttribute("action", '/author/' + option['process']); // 전송할 url var list = document.createElement('ul'); const li = document.createElement("li"); // hidden id값 입력 const hidden = document.createElement("input"); hidden.setAttribute("type", "hidden"); hidden.setAttribute("name", "id"); hidden.setAttribute("value", option['id']); li.appendChild(hidden); list.appendChild(li); if (process === 'Create') { // Create면 빈 값 list.appendChild(EditForm.input('Author', 'name', '')); list.appendChild(EditForm.input('Profile', 'profile', '')); } else { // Update면 해당 데이터 list.appendChild(EditForm.input('Author', 'name', option['name'])); list.appendChild(EditForm.input('Profile', 'profile', option['profile'])); } const submit = document.createElement("input"); submit.setAttribute("type", "submit"); submit.setAttribute("value", process); submit.setAttribute("class", "button-edit"); form.appendChild(list); form.appendChild(submit); var div = document.querySelector('.author-edit-area'); form.addEventListener("submit", FetchPost.handler); div.appendChild(form); }, input: function(text, name, value){ const li = document.createElement("li"); const label = document.createElement("label"); label.innerHTML = text; const input = document.createElement("input"); input.setAttribute("type", "text"); input.setAttribute("name", name); input.setAttribute("value", value); li.appendChild(label); li.appendChild(input); return li; }, deleteForm: function(id){ var form = document.createElement("form"); form.setAttribute("method", "Post"); form.setAttribute("action", '/author/delete'); const deleteID = document.createElement("input"); deleteID.setAttribute("type", "hidden"); deleteID.setAttribute("name", "id"); deleteID.setAttribute("value", id); form.appendChild(deleteID); const submit = document.createElement("input"); submit.setAttribute("value", 'Delete'); submit.setAttribute('class', 'button-edit'); submit.setAttribute("type", "submit"); form.addEventListener("submit", Edit.delete); form.appendChild(submit); return form; } }'생활코딩 > WEBn' 카테고리의 다른 글
[Javascript - AJAX] Node.js + AJAX - 기본 페이지 (0) 2021.02.09 [JavaScript - Ajax] 개요 (0) 2021.01.28 [Node.js & MySQL] 코드 리팩토링, 이슈 정리 (0) 2021.01.24 [Node.js & MySQL] 도전과제: 검색/페이징/정렬 (2) 2021.01.24 [Node.js & MySQL] 도전과제: 검색 - 색인기능 살펴보기 (0) 2021.01.20